Welcome!

Welcome to my blog, we're talking about quilting and other good stuff. I'm glad you stopped by ... look around, add a comment, become a follower if you feel inclined, tell your friends about me, and come back soon!


Wednesday, November 30, 2011

My anniversary and Orca progress

How did it happen?? 

One day I decided to start a blog ... then I looked around and it was a year later!!  Today is my first blogiversary, and I really have no idea where the time went. 


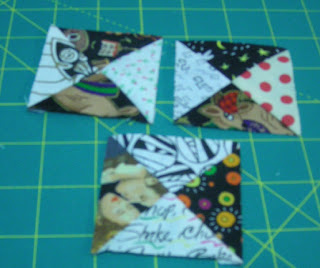
Just out of curiosity I held onto the waste trimmings in the first two steps of the Quiltville Orca Bay Mystery to see how much I'd have...
What a large pile!  The one on the left is from the hourglass blocks in Part 1, my neutrals and blacks.  The blues are from trimming down my string blocks in Part 2.

Some very interesting fabrics went into these little blocks, most of them totally unrelated except for being some shade of blue.


I didn't get around to pulling the papers off yesterday
... it'll get done, I understand it's a snap! 

Aren't you curious to see where these fit into the quilt, and what about those reds?  My mind keeps asking "will the string blocks for that step be larger?" 

It's a mystery!

Sew forth and sew on

Tuesday, November 29, 2011

Red and white challenge

Three things to be happy about:
(1) the voice of experience
(2) making up a new recipe
(3) the awe of it all

Last March a few members of my guild and bee went to New York to see Mrs. Joanna Rose's Red and White Quilt Display.  Carolyn (Lady Scrapbag) thought it would be a great idea to have our own Red and White exhibit locally, so she put out an invitational/challenge to create quilts and wall hangings using just red and white. 

I was thinking about what I wanted to do and kept putting off making a decision until our shopping trip to Lancaster in October.  Finally, just to keep it simple and quick, I decided to use an applique pattern I had in my pattern box. 

Sometime last year I scanned some of my "lady" fabric to my pc, printed it off and enlarged it at Kinko's ...

I have this fabric design in several colorways - black on blue, rust on beige, black on white... in fact, my blogger icon shows part of a quilt I made using multi-colored ladies - there's a lot of this fabric floating around!  I believe I also saw some with gold accents on black ... not my cuppa I'm afraid.

I'm using the ladies as silhouettes in red on a white background ... simple and easy!

The ladies are about 17 inches tall.  I traced them onto the smooth side of fusible web and fused it to the back side of some of the red fabric I got in Lancaster.  Then I cut it out, cutting away the areas in their dresses and head wraps and arms that would have been colors, to let the white background fabric show through these areas.  I bought some pretty red-and-white fabric but it wouldn't have been a good choice for this particular project; I believe it would have confused the eye because of all the cutouts in their clothing.

This piece will have a narrow red border, then a wider white border - maybe 3 inches - with adinkra symbols centered at the left, right, top and bottom.  It would be easier to put them in the corners, but I think that's a bit too "predictable"
I wanted to use symbols relating to womanly virtues, kinship, etc., so I chose to use these:

At the top left: DUAFE  - "wooden comb" - beauty, hygiene, feminine qualities;

the heart is AKOMA"the heart" - patience and tolerance;

at the bottom is NKONSONKONSON - "chain links" - unity, human relations;

the fourth one (not shown) is ESE NE TEKREMA - "the teeth and the tongue" - friendship, interdependence

I used fusible applique and a narrow zig zag to attach the main part of the quilt, the center is 16 x 18 (I think).  Each of the adinkra symbols was appliqued to a white square, then trimmed down to fit the border size. 

Now that I'm all caught up on the Orca Bay challenge, I can concentrate on this one again for a few days, it shouldn't take long to finish at this point.

Sew forth and sew on

Monday, November 28, 2011

I got the blues...

... sky blue! royal blue! teal, aqua, turquoise, sapphire!  Stripes, dots, stars, words, swirls, doo-dads... and they're all gorgeous together! 


I finished Part 2 of Bonnie Hunter's Orca Bay mystery yesterday, yes I did!  I used the Yellow Pages for my foundation and it was fun making these blocks because after I cut my squares, I didn't have to think or measure... just sew sew sew!  In no time at all I had a slew of blocks pieced, just waiting to be trimmed down!

I woke up early Saturday morning, around 4:30, but I wasn't sleepy so I got up to sew a few blocks.  I was thinking to myself that at that very time  there was probably another quilter sitting at her machine working on the Orca Bay mystery, piecing 3-1/2" blue squares, the same as me!  Maybe she was sleepless in Alexandria, Virginia... maybe sewing in Australia where it would have been 8:30 that night.... or maybe having that second cup of coffee while she sewed at 9:30 a.m. in the UK.  It was an awesome thought! 

Sewing these blocks was like eating peanuts, you didn't want to stop with just one or two.  I made 30 in my first batch and Bonnie was right - the amount of scraps does not go down!


I was having so much fun I finished all the 72 I needed, plus a few extra! 
Isn't that a nice looking stack?  I just have to remove the paper from the backs and I'm all set - the ones I don't use for the mystery will go into my parts department to be used later.  I don't know at what point we'll need these blocks, so I'll sit down and de-paper them before the next step is posted on Friday!

And oh yes, my 2-1/2" black-and-neutral blocks are all done too...
...all 224 of em, plus a few extra!

Be sure to visit the Orca Bay Mystery Monday Link Up page to see what everybody else is doing!


Moving right along... the first 3 pictures look a bit blue-ish, don't they?  I've been fooling around with the white balance setting on my camera trying to make the pictures clearer.  Fluorescent, incandescent, daylight... who knows what, anyway?  I only know "auto" looks funny.

Sew forth and sew on

Sunday, November 27, 2011

Wee Bee fun

Yesterday was jelly-roll race day at our bee and oh boy did we have a lot of fun!  We came prepared with our jelly roll strips pieced end-to-end and were rarin' to go...


 except for a little detangling action!  Details... always details...

And we were off!  I was inspired...  I was fantastic...  my machine was a-whirring!!
... I was sewing without thread! 

Just after Lynora took my picture (about 2/3 of the way thru my first round) I realized my thread had slipped the needle at the very beginning ... all I was doing was making neat little holes in my strips!  Well.  Dang.

Okay, I got me set up again and I was off!  I was inspired ... I was fantastic ... my machine was a-whirring!!  I asked Marlene to take my picture, quick!!

I'm rolling now!  at this point I'm on my third round.  Of course, I'm also far behind everybody else!

And the winner is...
Gwen, better known as Miss Speedy!  She finished in about 45 minutes, isn't it beautiful?

Other pretty finishes...


and last but not least...
mine, woot woot! 

We had a great time doing this race, I highly recommend it!   This is also a quick and easy way to make a baby quilt, just use fewer strips instead of the entire jelly roll - thanks go out to Heirloom Creations Shop for their YouTube video. http://www.youtube.com/user/HeirloomCreations.


And so, with the food eaten, the leftovers divvied up, and the room put back into order, we said our goodbyes til the next time...

Sew forth and sew on

Saturday, November 26, 2011

Foto Finish: Birds


Felicia slices The Bird on Thanksgiving day.

To see other Foto Finish entries, please visit Barbara at Cat Patches!

Sew forth and sew on

Friday, November 25, 2011

Four-inch Friday

More 4-inch blocks in my Block a Day series...

#13 - light blue, aqua and gold (or tan)
another case of the scanner washing out my colors!  The background is really a little darker than it looks.  I like what I did on this one because it's simple and can be turned horizontally or vertically and still look great!


Block #14 -


This one reminds me of a window in a flat-roofed adobe building.  We're viewing it as if on an overcast day because of the two shades of gray for the background.

Sew forth and sew on

Thursday, November 24, 2011

Wednesday, November 23, 2011

Orca Bay step 1 progress

More progress on my Orca Bay mystery quilt!

Yesterday I took a careful measurement of the hourglass blocks I made and discovered some of them were just too far off - yeooww!  Trying to sew those little pieces accurately was tricky, at least for me.  Those little rascals kept slipping and sliding, not a good scenario for bias cut fabric!  I like the specialty ruler but maybe I'll save it for larger cuts?

Out of the 10 blocks I made, I was able to salvage 6 of em... the rest will go into my parts department bin.  These are the rescued ones...

Mr. Cool made the cut, yes!!!

To make my life easier, I decided to make the oversized HST blocks, cross cut and sew again... you know what I mean!  I know the instructions say to cut a 3-1/2 or 3-3/4" square, but to make my life easier I just cut a 4" square and kept on going!  Does it waste a little fabric?  Yep!  Does it matter?  Nope, not when I'm trying for accuracy!

I drew a diagonal line, sewed 1/4" on either side, cut on the drawn line to make two HST, yadda yadda yadda.  Then I mated two different ones black-to-neutral, resewed and cut. 

I went from this...


to this...

26 hourglass blocks done!  There are still 19 HST block sets to be sewn together, to yield 38 hourglass blocks.

To make the final trim I used the 45-degree line on my ruler placed directly on a seam line, lined up the seam intersection at 1-1/4" from the edge (half of the required 2-1/2" finished size) and trimmed.  Then I turned it a half-turn and made a vertical trim at 2-1/2" wide.  Confused yet?  
Simply put, I trimmed the side with the circles w/my ruler's 45-degree line on the seam line, turned the piece around and trimmed the other edge to make the block 2-1/2" wide, then did the same thing to the top and bottom edges.  Hey, it worked for me! 


I knew I might have a problem with color when I used the "romantic" fabric, and maybe also the reindeer fabric. 

Sometimes you don't know til you recut and resew... in this case the blocks below were sorta iffy, so I'll put them aside for now...

not quite enough black showing to qualify!

I like my scrappy neutrals but I also like what some people are doing with just white-and-black fabric for their neutrals.  I'm not particularly fond of the fabric above with the large balls, I'll keep what I've done but I won't use any more of that one.  Also, that piece with the music score sheets?  and the blue recipe on white background?  I'll eliminate those too!  The musical score looks a bit grey at that small size.

Be sure to visit the Orca Bay linky at Quiltville to see what other people are doing!

Sew forth and sew on

Tuesday, November 22, 2011

I took the Orca Bay plunge!

I kept telling myself "no, no, no, not til you finish some other stuff!" BUT after seeing all the blocks everybody else is doing on Bonnie Hunter's Orca Bay mystery I just had to jump in!  Bonnie is posting the clues on Fridays, then on Mondays you can show your progress using her linky.

When I went to pull strips, I only had a few 1-1/2" neutrals
I'll have to cut some from yardage stash, yaaaay!

I had no blacks at all, so all those will be cut from stash; here are a few fabrics I'll use...


See that very colorful piece with the cave men?  Some of the strips were okay, but others were a bit iffy...

I thought I'd better be safe than sorry, so those will get tossed into my parts department bin to use later.


I took this picture of my progress last night...


Then this morning I woke sorta early and decided to really get into em...

10 sets done!  See the caveman peeking out?  Because there's a good bit of the black background around him, I figure he can come too.  Anybody have any thoughts??

That's my progress so far and I feel encouraged!  Someone gave a tip on making the blocks lie flat by unsewing a thread at the center junction.  Then I pressed the seams in a counter-clockwise direction and they lie flat as a pancake... I forgot who it was, but she has a linky on Bonnie's blog - thanks, my quilty friend!

Update: I discovered who to give credit for the great tip - it's Cissa, visit her blog here

Sew forth and sew on

Monday, November 21, 2011

Block a day

Here are two more 4-inch blocks I made...

Block #11 is a simple arrangement of off white, green and purple. 

To make the purple and white strips I first sewed the white on either side of a 2" piece of purple, then cross cut them at just a shade under 3/4". I wanted the strips to be skinny skinny!


Block #12 is very pretty but the picture doesn't do it justice...
This is actually the first block I made when I thought of my 4-inch project, and I thought it was so cute I decided to go for it! 

The color is more aqua than it looks onscreen, and I think the scanner washed out the color.  But, if I take a camera photo of the blocks they have a moire effect that I don't like.  SO I have to decide whether to continue scanning them to eliminate the moire effect, or go back to the camera for a true color... decisions decisions.

Well enjoy - I might decide to post these blocks on Fridays as a "4-inch Friday" post; we'll see!

Sew forth and sew on

Saturday, November 19, 2011

When is a jelly roll not a jelly roll?

Three things to be happy about:
(1) the spire of a redwood
(2) colorful backdrops
(3) the artistry of sushi chefs

Someone asked about the small quilt I sent off to Australia in the Little Quilt Swap; it was the one I named Superstition.  I tried to pull a picture that I already loaded but blogger is so undeniably slow at loading those pictures!  You can see the quilt here, it's the one on the left.  Also, it's in my photo stream on the right side of the blog.


By now I'll have to go ahead and accept that fall is here!  Not only is it colder and the leaves are falling, but it gets dark earlier, even after the fall-back of the clock.  And speaking of that, when I went to change the time on my bathroom clock, I was shocked to see this:

Do you see how corroded that battery is!?  Lately I noticed that the batteries in my camera seemed to be expiring way too soon, but then I wondered if it was only in my mind.  Now this clock battery gets me wondering if I've been using from a bad batch?  Or could it be the steam in the bathroom caused this battery to corrode??  It's never happened before and I'd hate to ruin my camera.


I saw these pretty bushes yesterday when I was out and had to take a picture!
I like the play of the rusty-red against the green... quilt color option?  I don't know one shrub from another, but they're not the same kind or they'd be the same color, I reckon. 

So, back to my original question ... when is a jelly roll not  a jelly roll??   
When it's a sushi!

My bee is having a jelly roll race at our next meeting and we're to have our jelly rolls sewn end-to-end before the meeting, so we can start the race at a trot.  I bought this sushi roll back in April, but in my mind I was thinking I had a jelly roll.  But it isn't...

This sushi has 24 strips but a jelly roll has 40... sew I have to make it grow up into a jelly.  No way am I buying an "official" jelly roll, I have more than enough batik yardage to cut 16 more strips at 2-1/2 x 40! 
I pulled these to cut from, I'll have em cut and sewn before next Saturday!

Well today is my guild meeting, it will be good seeing people I haven't seen since the last meeting... I'm looking forward to a fun meeting!  Have a great day everyone.

Sew forth and sew on