Welcome!

Welcome to my blog, we're talking about quilting and other good stuff. I'm glad you stopped by ... look around, add a comment, become a follower if you feel inclined, tell your friends about me, and come back soon!


Tuesday, February 28, 2012

More blocks pieced

Three things to be happy about:
(1) egg salad sandwiches
(2) souvenirs of your travels
(3) framing a diploma

I pieced a few more "x and +" blocks, and when I looked at what I did I notice I'm still having contrast issues with some of the blocks. 


It's supposed to be a scrappy quilt... but isn't it funny how you can put fabrics together - intentionally letting the colors fall where they may - and sometimes they just don't "mesh"? 

So... I found myself with two choices (1) unsew the blocks I'm not crazy about and try another combination, or (2) leave them alone and maybe they'll get lost in the shuffle at the end.  I opted for #2!

I have a grand total of 9 done so far, and I still don't know how many I want to make yet, it's one of those "whenever" quilts!  I believe somehow I'll "know" when it's time to stop and sew them together.

My Bee's challenge this year for Friend and Family day at the rec center is to use a traditional pieced quilt block (or blocks) from a list the Challenge committee provided.  Paper piecing is okay but we can't have applique or embroidering, and it can't be an art quilt.  I've chosen my block but as usual I can't show what I've done til the event in June.   Not going "arty" is like keeping a horse penned up, I'm used to flying all over the place with my quilts!

Last year's challenge was to make a quilt based on a Motown song, I enjoyed doing my quilt and seeing what take everybody else had on the theme.  Here's the post if you're interested in seeing some of the quilts; I sent mine to someone in Australia for the little quilt challenge  a few months ago.

Since I have to do two community service quilts for a local hospital this year, I might let my Bee entry do double duty again this year.

Well today more of the same - sort a little, cut a little, sew a little - I think I've developed a rhythm!

Sew forth and sew on

Sunday, February 26, 2012

Wee Bee quilting

... and eating, and celebrating, and sharing, and just enjoying each other's company!

My quilting bee met at the rec center yesterday for the first time since November, and we were pleasantly surprised by a new mural on the wall...
it's almost floor-to-ceiling and I think it's a nice touch!


We all had a great time as usual, especially since we got a chance to celebrate Felicia's (The Slow Quilter) birthday.  Carolyn - better known as Lady Scrapbag, also better known as cake baker extraordinaire - made her a gingerbread birthday cake that was scrumpti-licious!

Gwen, our beading queen, showed off her coat that she started on a December quilting cruise with Rachel Clark
The picture doesn't do it justice!  She enhanced the design with sequins and beadings - take a closer look at these dolphins on the sleeve:
there are also beaded flamingos, sandals, an umbrella, turtles, coctails - it's a beautiful, beautiful coat.  I really admire Gwen's efforts on this one!

And here's a signature quilt Pat started on the same cruise...

she's in the process of deciding on a border treatment.  I really like the center fabric - the color is a bit off in the picture but it's a nice shade of red.

Our other Gwen was working on blocks from the book Radiant New York Beauties by Valori Wells 

I wish I'd thought to get a shot of her blocks, they're really beautiful.


And what would a quilting bee be without good food???
there was salad, fried fish, shrimp, collard greens, sliced fruit, cakes (three!), chips and dip, chicken (rotisserie, baked and fried!), deviled eggs, and little spicy meat pies.

But what was I waiting for?

let's cut the cake!!!

So til next month, keep the buzz on, little bee friends...

Sew forth and sew on

Wednesday, February 22, 2012

She can't help it

Hi everybody, howdy followers!!

Three things to be happy about:
(1) Smuckers jam
(2) retreating to your lair
(3) Chia pets

Did anybody ever have one of those chia pets that actually worked?  I remember getting one years and years ago that started growing, then the little shoots just dried up and died.  No amount of water would bring it back, so I think the problem was with the base it was made of.

At our guild meeting Saturday I was reminded of the opening lyrics to the Little Richard song
She can't help it, the girl can't help it
I'm trying really hard to cut down on my fabric purchase (been doing great so far!) but Cynthia had a bag of scraps to sell... and ...
well, to be honest it was just too tempting!  "She can't help it, the girl can't help it!"

When you say the "S" word it gets my attention, so I went ahead and bought it - just look at all those great scraps!  There were a lot of batik pieces in the bag, all those great colors made it just too tempting to pass up.  I know y'all understand how it can be...

Regarding the renovations next door, the house was purchased by a development company which is planning to flip it.  According to a rep I spoke with at their office, they're "putting a new house in an old shell," so that's why there's been so much demolishing and rebuilding going on.  It shouldn't be much longer now, they started the first Monday in December so they're going into their 11th week.  Probably another two weeks or so.

On News 4 the other morning they were answering questions from viewers, and this one got my attention -  One person said his fiancee had the habit of taking pictures of her food when they went out to dinner and posting it on facebook, then constantly checking to see if there were comments.  He wanted to know if he was unreasonable to ask her not to do it.  You know I had to laugh!  The general consensus was that it was okay if she took pictures, but she should wait til she got home to post it. 

With that being said, here's a picture of the salad I had for dinner at Golden Corral, after guild meeting Saturday  ;o)

Sew forth and sew on

Tuesday, February 21, 2012

To the roof, boys!

... or, "A day in which nothing important happens"

If you've been following me awhile you'll probably guess I'm whining talking about the renovations to the house next door to me.  Yesterday they started work on the roof and they're back up there again today,  which is fine with me up to the point all that debris comes flying down into my back yard.
It looks like old guttering or something, it's a lucky thing my car wasn't parked back there!

One of the guys picked it up, but I'm a bit tired of all the trash back there

and this is the third yard full of stuff! 

And lookit that grin after he picked up the pipe...

doesn't it just say "I know I'm wrong but if I grin real nice it'll all go away"?

So much for that nonsense. 

Yesterday was one of those "I don't want to think about a pattern, I just want to massage my fabric" kind of day, so I made some more crumb blocks...

I like the mix of colors and I do try to sneak in  bits of ugly fabric every now and then; I think crumb blocks are the perfect camoflage!

I haven't decided what to do with these yet, but crumb blocks will always have a place in my repertoire, so to speak.  Take a look at blocks from a quilt I made using crumbs for the star centers:


If you want to see the full post, you can find it here.  I'm also thinking of a churn dash or monkey wrench block, with crumbs in the center.

Well, this is a late post for me but I hope you enjoy the rest of your day! 

Sew forth and sew on

Monday, February 20, 2012

Odds and ends, and a little housekeeping

Three things to be happy about:
(1) flat-screen televisions
(2) ice cream toppings
(3) long-lasting batteries

First the odds...

While I was fumbling around in my stash I found a container with all this shredded fabric in it.  I remember rotary cutting some ugly fabric to make slivers no wider than about 1/8" wide when I was doing a spring quiltie swap I was in a few years ago - was it 2010?  It made a nice looking bird's nest - 

but what are the odds of me using the rest of it??  Something in an art quilt maybe?

Now for the ends...

They did finish installing the flooring next door, so I haven't heard any unbearable banging for two or three days, hallelujah!  They delivered and installed kitchen cabinets, they changed the outside doors (although I thought the front door looked just fine ... but what do I know?)  Saturday they were doing something in the second floor ceiling ... quiet, mysterious man-stuff.

Another end... while I wasn't looking Blogger changed the word verification format on the comments, so I'm turning it off.  I like getting your comments but you shouldn't have to jump through loops to leave em!  Of course I never see the words on my own blog but I went to comment on another one and you can't even read the darn thing!   So off it goes... get to steppin'.  I wonder what other little goodies they have in store for us?

And in the housekeeping department...  I'm still sorting and folding fabric, my goal is to get as much of my fabric inside a container as possible.  I've been in some people's sewing room where their stash looks really nice on the shelves, but I have an issue with sun fading.  My sewing room is across the back of my house, where there are 5 windows.  Also, I have a dust issue... where does it come from??

So, nothing you couldn't live without knowing, but there you have it!

Enjoy your Monday - sew forth and sew on

Sunday, February 19, 2012

I always like that 3rd Saturday of the month

... because it's my quilt guild meeting day! 

Yesterday was another great meeting, I hadn't seen some of the members since November - how time flies!  I couldn't make it to the December meeting and January's was cancelled because of snow.  Here are some highlights from yesterday's meeting.

Our quilter of the month, Cynthia, showed some great quilts yesterday.  I really like this one she holding, which she named "Got Coffee" -
look at those bright coffee cups against that black background ... a winning combination every time!

Here's an art quilt by Donnette I thought was unique:
She called it her "Road Kill" quilt.  See that gorgeous mask?  It's a recycled can!  She says she cleaned up the highway and recycled all in one swoop! 

Here's a closeup of two other masks she did...

so much talent in our guild!

Charley did a Fractured Landscape workshop/demo...

This pattern takes a lot of attention and concentration, but she says she made the demo quilt in the upper photo, in an afternoon! 

Nadine, who recently closed her brick-and-mortar quilt shop, she generously shared dozens and dozens of patterns with us. 
There were 15 unopened boxes - and she has more to bring next month!  It's too bad I don't do any garment sewing, there were some great patterns in there.

We had door prizes, good food and good fun.  It was a pleasant day and a wonderful meeting, everyone had a great time catching up with each other (you could tell by the noise volume!).   Nancy Meier and Carol Roberts from Faithful Circle Quilters stopped by to sell tickets for their 2012 raffle quilt “Stars in Bloom."  I didn't get a picture but you can see it on their website but believe me, the picture doesn't do it justice.  It's a beautiful quilt!

But what would a guild meeting be without following up with a meal someplace?  Felicia (The Slow Quilter), Pat, Carolyn, Charline and I went to the Golden Corral... you gotta like that place, especially if you care enough to go on a Saturday afternoon!  Wall to wall people, eeeeyow!  There must have been several groups there yesterday, including a high-school basketball team ... ask me how we guessed, LOL.

So that was my day, it was a good un ... sew forth and sew on til later
Linda

Tuesday, February 14, 2012

What to do...

what to do???   I'm being driven off my nut, out of my tree, bananas, off my gourd!! 

What in the world is she talking about??

They're STILL working on the house next door to me and yesterday I felt like I was
going
out
of
my
HEAD!

There were about 6 men working inside yesterday; among other things they were installing new wood flooring and the noise was louder and more intense than ever before!

All day long, until about 5 pm, there was banging and banging and some kind of continuous buzzzzzzzzzing sound!  Above you see one installer using a skillsaw; that's not the sound I was hearing from inside, it was probably an air cleaner.

At one point I was on my porch and I said something to the guy like "Sounds like you're doing a great job in there!"  Then he asked me if I wanted to see what they were doing.  And, being a nosy inquisitive sort of person, I went inside to take a look...

This is the only picture I took:  standing just inside the front hallway, looking into the living room and dining room.  They've removed the far dining room wall which was technically the back wall of the house (that's probably where all that brick came from a few weeks ago).  The kitchen has been completely dismantled, I think they're moving it out to the enclosed porch area to make a very large kitchen/dining room combination. 

As far as I could tell, they're making what's left of the old kitchen into some sort of large storage area (or powder room), hence all the banging and scraping I've been hearing on the common wall the last week or so. At the same time they were also working in the basement doing who knows what.

So much for that nonsense, I'll keep my nose pressed to the window for more snooping ops or whatever.

I wasn't able to make it to the Red & White, Too artists' reception Saturday but I understand it was very well attended with a positive response!  Here are some more pictures from the exhibit:

"King's Fancy" by Bernerdette King

"Petals on a Pond" by Loretta Tatum
The quilt above is a cutwork technique that Loretta taught us at our 2011 Scrapbagger's retreat in Deep Creek, Maryland.

And last but not least, this beauty was done by Deb Sanger:

"I Heart New York" by Deb Sanger.
 I still have more pictures that I may share later - enjoy your Valentine's Day!

Sew forth and sew on

Monday, February 13, 2012

Stash count

Three things to be happy about:
(1) whiling away an afternoon
(2) chopping like a chef
(3) quilting

I've been thinking about starting a weekly stash count but I haven't done anything about it yet.  Well, I think today's the day, get to steppin'!

There's no way I'm going to measure and count all the yardage I have in my stash, Mission Impossible for sure!  I'll just start with what I use and what I add, on a weekly basis. 

So... my grand total for last week:
Added:  -0- yards
Used:  1.5 yard (?)
Scraps cut into usable pieces (?)
Last week I made that little fractured crumb quilt and I'm not *quite* sure how to count crumbs, so I measued the piece and got an approximate count.  That includes fabric for the back, border and binding - the three B's.  This seems a bit small... I'll just let it be for now; I might change to a rounding-up or -down method later on, as I get used to doing a count. 

I actually meant to start my stash count in January, but a start is a start.   This will help keep me aware of what I'm doing!

Sew forth and sew on

Sunday, February 12, 2012

Friday, February 10, 2012

Things that make you go...

... whatever!

I went for loc maintenance yesterday; my loctitian shared this with me:


Sew forth and sew on

Thursday, February 9, 2012

Contain yourself!

Three things to be happy about:
(1) the joys of hibernation
(2) plans for a February vacation
(3) creative juices flowing


I like that slogan from The Container Store - Contain Yourself!  I saw these really neat battery storage boxes when I was in there the other day looking for just the right size plastic tub to sort my stash into 

This one holds a dozen AA batteries and it's relatively flat, so I can carry it in my purse.  They also had sizes for D-cell, AAA and that other size, but my camera uses eats up the AA size.  I'm still trying to bring order to my sewing room and I didn't see the container I wanted (JoAnn carries them) but I always get a kick out of looking around in there.

Speaking of order out of chaos, have you ever run across bags and boxes of stuff in your sewing room that you wonder where they came from, but when you put them there Lord knows when, you didn't label them because you were sure you'd remember exactly what was in them?  Me too!

I found these two mysterious baggies a couple days ago, stuffed to the brim...
What? when? why??

I found lots and lots and lots of 2-1/2" squares I cut from African fabrics...


I know I cut these - myself - at some point but now I don't know what project I had in mind when I cut em!  Or was I just cutting squares for the hang of it??  When did I cut this fabric??

And this abundance fell out the other bag...


9 patches!  dozens and dozens of 9 patches made from the prettiest soft colors you ever saw


I counted 122 completed 6" blocks, plus lots and lots of 2-patches, plus other 2-1/2" squares waiting to be paired and sewn.  This bag contains enough 9-patches for a full size quilt!

So, I'm still on a mission to "contain" my sewing room by labeling the mysterious stuff, re-designating or repurposing other stuff and just plain using up what I can! 

Sew forth and sew on

Wednesday, February 8, 2012

Tutorial: Fractured crumb blocks!

I was playing around with some scraps, when I discovered this new way to use crumb blocks! 

I had made a few blocks and put them on my design wall, with the idea of sashing each little block with a solid fabric and making a small quilt.  These were my starting blocks:
please excuse my design wall, it's covered with strings, pins and lint!

*Note* You'll see me using "square" and "block" interchangeably in this tutorial... they're the same to me!

Make some crumb blocks from small scraps/crumbs; try to use more than just strings and strips, I think odd-shaped pieces give your crumb blocks character!  For a great tutorial on making crumb blocks, check out Bonnie's tutorial on crumb piecing, and Victoria's tutorial on creating "made" fabric.  Just keep piecing until your blocks are approximately 5 inches wide or tall - try for an even number of blocks.  I think a rectanglular shape works really well for this pattern. 

When the blocks are the size you want, trim to even up the sides.  You can make a few angle cuts to add interest but try not to have the angle too sharp, it'll be hard to work with in a later step.

Cut 2-1/2" sashing strips to add around the squares.  Just because it was handy, I used muslin but you can use regular white or off-white fabric.  Why 2-1/2" strips?  At this point I was still fooling around, but they seem to work! 

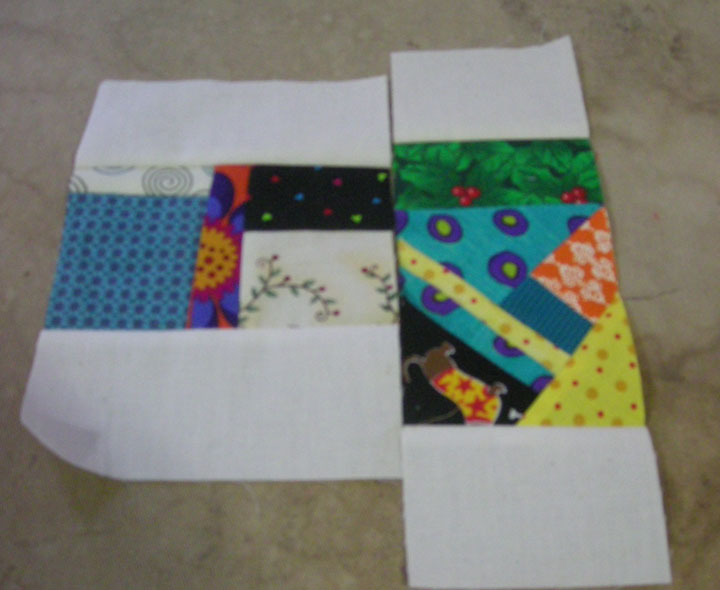
Add sashing to opposite ends of your squares.

At this point begin to pair up your squares, to see which two look nice together.  For now, just ignore the relative size of each square ... we'll deal with that later.  If they look good together, they're a pair!


**At this point I want to stop and point out something very important!  See the dingy surface the blocks on the right and in the photo above it are lying on?  That's my ironing board!  I hereby give each and every one of you permssion to show your stained ironing board cover in your blog posts.  Come on now... we all have stained pressing surfaces, let's not pretend we have a "good" ironing board cover that never gets grungy!  If you press using steam, sooner or later the combination of heat plus dripping water will cause staining, it's a quilty fact of life!  No quilt blocks will be harmed while using this surface.**

Now, back to my tut...

When your pairs are sorted and lying side by side, add another sashing strip to what you've decided is the  outside edge of each block.

Next, sew the pairs together along the raw, un-sashed side.  Don't try to match up the middles, they won't!
The pieced middles do not match - they aren't meant to!  That's an important design element; it's what makes this crumb block "fractured!" (See my grungy design wall?)

Decide whether you want a vertical or horizontal layout; for this tutorial, I'm going with horizontal.  Notice the uneven top and bottom edges ... this is the awkward part. 

Trim the inside edges of each block straight, then pair two of them together and sew.  Align them so that when they're lined up, you have as much sashing at the bottom and top as possible, because you'll have to even up those edges after sewing. 


Trim the bottom and top of each set, sew the rows together, then square up the outside edges.  I set my final blocks side by side, separated by the middle sashing strip.  Note that the sashing isn't a consistent width in the middle or on the sides - it doesn't need to be, this adds to the fractured look!  Add a border, quilt as desired.


Below is a closeup of my quilting; I wanted to continue the fractured look, so I quilted slightly curvy lines diagonally across the quilt.


Well, I hope you liked my tutorial!  I apologize for all the pictures but I thought they were necessary.  Wouldn't this make a lovely table runner?  And what if you paired three together instead of two? 

If you like the pattern and use it, please kindly link back to me, then let me know - I'd love to see what you've done!

Sew forth and sew on
Linda