Welcome!

Welcome to my blog, we're talking about quilting and other good stuff. I'm glad you stopped by ... look around, add a comment, become a follower if you feel inclined, tell your friends about me, and come back soon!


Showing posts with label Get er Done. Show all posts

Tuesday, December 18, 2012

On a wild goose chase!

"December, in my memory, is white as Lapland, though there were no reindeers. But there were cats. Patient, cold and callous, our hands wrapped in socks, we waited to snowball the cats."
- Dylan Thomas, "A Child's Christmas in Wales"

When Bonnie at Quiltville showed us her latest antique quilt, I was goosed by inspiration! Sometimes she'd show us an antique quilt and I'd think "wow, look at that piecing!" or "oh man, how'd she have the patience to do all that" or "how pretty!"  But the one with the scrappy-stringy pieced geese?  It  talked to me - it called out and said "MAKE ME!!"

My first thought was to replicate the quilt as it was made by the quilter, but I'm changing the colors a bit so it won't look exactly  like the original - I think it's only fair that Bonnie gets dibs on replicating it exactly, after all it was her find!  I have a sort of mottled brown that I'll substitute for the alternating solid green strips, and I'm using a sort of off-pink-cantaloupe-y solid for the goose wings.

I went to my stash of unused (and under-appreciated!) homespuns and started cutting strips for the goose body. I didn't have any already cut because I haven't been using the homespuns, just hoarding - uh stashing - em! I'm also using recycled shirts, but I have just a handful of those.

Because I'm a creature of get-er-done and instant gratification, I'll be paper piecing my geese from start to finish! 

I found a flying geese pattern in EQ called "Flying Geese V" and printed it at 6 x 12, this gave me 4 geese stacked in a row; it'll cut down on the number of seams.

All my strings have been pieced on 5" squares of phone book paper - each square will give me the body for two geese.

So here's the first group I did, not bad!

Homespuns by their very nature are loosely woven, so I hit each block with a little spray starch before I cut them apart.  Some will be cut crosswise, just for variety!

I think this is a very pretty quilt, and I thank Bonnie for her generosity in sharing it with us!  It also seems to be a very quick quilt to make, owing to the paper foundation piecing ... I wonder if the original quilter did hers on foundations?? 

Well, it's the podiatrist today, my last medical appointment of 2012 .. sew forth and sew on, have a great Tuesday!

Friday, December 14, 2012

My Festivus list!

Three things to be happy about:
(1) straight teeth
(2) overalls
(3) a foosball match


In a nutshell, the "Festivus" celebration was born on the Jerry Seinfeld show, where George Costanza's father wanted a celebration "for the rest of us."  He'd get a Festivus pole and gather the family around and berate them for their failures during the year.  The poorest performer would have to carry the festivus pole of shame.

Well, I love Christmas and I don't celebrate Festivus, but I thought it would be a fun name for this post.  Throughout the year I started things that for one reason or another I didn't finish; I don't mean UFO's, that's a whole different category!

So, this is my Festivus list, or "things that I dropped like a hot tater."

First up - Inspired by Toefeather, I wanted to make a 4-inch block every day for a year, then I'd have 365 blocks to make into a quilt.  Clever girl!

Seemed easy to do and it really is, but that daily block became a group of weekly blocks, then there were no blocks at all, doh!   After I made 35 blocks I discovered I wasn't sure I liked how they all looked together and I dropped that idea!  I'll make one more then set them in a quilt with sashing in between.

Another one - a slashed 9-patch block using African fabrics. 

Sounded like a good idea and the single blocks looked great... but when I placed several of them together on my design wall - yuck!  Not my idea of an attractive quilt.  If you stared at it too long it'd probably knock you down!

I could take the ones I did and set them with some kind of sashing (w-i-d-e sashing!) I suppose, but I'll not be making any more of these rascals!

Here's a good one - South of Baltimore!  I was using scrap yardage to make the flowers and leaves.

This actually should be considered a UFO because I can finish it by simply making two more blocks and setting them in a gigantic four-patch.  The blocks are 16" square so they'd make a nice wall hanging.  At this point I can't remember why I dropped this one - UFO!

And last but not least - my stash report!  Where did that go? Well, I found it tedious to try and figure out how much fabric I was using every week.  I stopped my wild fabric buying several months ago, I don't even look at the emails from Hancocks of Paducah or Thousands of Bolts or eQuilter (why haven't I dropped off those mailing lists??) and I think I've bought less than two dozen yards this year, so maybe the list did have some effect!  How much fabric did I use this year?  I have no idea but I know I used some, so that's a good thing!  So that's my story and I'm sticking with it!

If you had a quilting Festivus list, what would be on it??  I'd love to hear your hidden secrets!  Have a great Friday - sew forth and sew on til later!

Monday, October 8, 2012

Looking good

Three things to be happy about:
(1) a magazine worth reading
(2) cold-weather cooking
(3) lightweight down comforters

This is certainly the weather for lightweight down comforters!  Yesterday was downright chilly, and rainy to boot.

Once again, yesterday I had the lead role in  June Cleaver Does Quilting ... I finished piecing the blocks for my new Three-Six-Twelve quilt with African fabrics, and put the top together.  I even put the borders on two sides... take a look!

I arranged the blocks the way I wanted them, but when I used Bonnie's tip for webbing the top, part of the first two rows got twisted around; some of the layout is off, but who can tell?

Miki, I wish I'd seen your comment sooner about using solids, it's a great idea!  All the African fabrics sorta moosh together but it's still pretty.

Thanks everyone for your comments, have a great Monday!

Sew forth and sew on

Friday, October 5, 2012

Starting a bigger quilt

Three things to be happy about:
(1) a movie worth seeing again
(2) Andy Griffith Show reruns
(3) glossy photos

I like the Three Six Twelve pattern so much that I started another one, this time it will be throw size and made using African fabrics. 
I started cutting some pieces yesterday, this is a great time to use up some of the fabrics I've had in my stash awhile.  It's not that I don't like them, I just haven't used them yet.

This quilt will be set four blocks across and five down, with borders added to make up the size I want it to be.  Or maybe I'll put half-blocks along the sides... we'll see.


I had a half dozen sweet potatoes that I got from the "veggie truck" but they're rather large - too large to bake, I think.  I decided to slice and freeze some in a single layer so they wouldn't stick together, then I put them in a baggie.  They froze nicely, now to cut up the other ones....

Frozen sliced sweet potatoes
When I'm ready to eat some I'll fry them (what's the opposite of "deep fry"?) in a skillet with just a little olive oil and butter, just enough to keep them from sticking.  They're good if you add a sprinkle of brown sugar as they cook, but you have to watch closely so they don't scorch.

That's it for now, have a great Friday... sew forth and sew on!

Thursday, October 4, 2012

Easy as Three-Six-Twelve!

An easy tutorial using large blocks!


Sometimes you need something that's quick, easy, and fun to make - this little quilt is all that, and can be pieced in a day.  In this pattern anything goes - large prints, small prints, geometrics, flowers - use those scraps!  Gather up your brightest scraps and let them shine!

The idea behind this quilt is to make blocks that finish at 12-1/2"; I've named it Three Six Twelve simply because of the size strips I used.  This pattern can be adapted to any size from wall hanging to baby quilt to full size - just increase the number of blocks!

To get started you'll need to cut strips in widths of  2-1/2, 3-1/2 and 6-1/2 inches ... if you normally cut your scraps into strips, and you already have 2-1/2" strips - you're that much farther ahead!  To make a 36 x 36 quilt (before borders), I cut my strips in these quantities:
2-1/2 x 6-1/2 (24 pieces)  and  6-1/2 x 6-1/2 (8 pieces)


3-1/2 x 12-1/2 (10 pieces)  and  6-1/2 x 12-1/2 (5 pieces)
Here's how to combine the individual "parts" that can be put together to make the finished blocks:

combine two 3-1/2  x  6-1/2" strips (should finish at 6-1/2 x 12-1/2) to pair with another 6-1/2 x 12-1/2" piece:

combine three 2-1/2  x  6-1/2" strips (should finish at 6-1/2 x 6-1/2) to combine with another 6-1/2 x 6-1/2 piece:

combine six 2-1/2  x  6-1/2" strips (should finish at 6-1/2 x 12-1/2) to pair with another 6-1/2 x 12-1/2" strip:

You can also join two 6-1/2" squares (not shown) to get a 6-1/2 x 12-1/2" piece, to pair with another of the same size.

These part combinations can be joined together in different ways to make a 12-1/2" finished block.  There are literally hundreds (dozens?) of ways to combine these pieces!  Feel free to use different combinations to get the result you want, two blocks are shown below.  Also, study my quilt above to see how I combined the blocks. 


When you have the blocks assembled, rotate them clockwise and/or counter-clockwise to get a pleasing layout...
and sew together in rows.  Add a border if desired - I used a 2" finished border on the sides and 4" finished at top and bottom.

Quilt as desired, bind, and you're done!  See how quick and easy that was??

I hope you enjoyed the tutorial!  If you need clarification on any of the steps, please email me or leave a comment.  Sometimes I'm guilty of thinking faster than I type - just call me Maxine Headroom!

Sew forth and sew on!
Linda

Saturday, June 30, 2012

another top done

I felt like a little instant gratification, so I made a small cobblestone quilt like the ones Wanda at Exuberant Color does.

I dove into my batik stash and pulled a dozen fabrics that looked okay together as a group, then sorted them into pairs that I cut at 7-1/2".

Isn't it funny ... the more fabric you have, the harder it is to go ahead and make a decision about pairing two up.  At least, that's the way it is for me!  I have batiks in lots of colors, but they all seemed to be either greens or browns.

I made cuts at both sides of the pair o' squares to give me three strips, then I cut the top and bottom of the middle strip...
next I moved the underneath portion of the middle strip to the top o' the set.  One pair o' squares gives me two blocks each!

After piecing a dozen blocks I put the top together, but then I decided to make four more to make it a 4x4 layout. 

I wish I'd chosen a different fabric for the border, though.  And the two blocks in the top right corner ... not the best of friends!  Whyyyyy can't.... whyyyyy can't we all just get along? 

Whatever.

Now, the block below should go to the "what was I thinking?" department...

... those colors just won't dance together!

So that's what I was up to yesterday, sweating all the while.  Sew forth and sew on til later...

Thursday, June 21, 2012

Tis the season

I finished piecing the top for the 6-inch blocks I was working on, this was a very easy top to piece.  I should put it in the category of a "get er done" quilt! 

For the border, I decided to use a piece of batik-y fabric I had, just to use it up.  I cut the strips to finish at 4 inches... I think this will give me a large enough quilt.  I'll piece something for the back, not sure what yet, whatever I find in my stash that compliments the front.

In my guild (and bee) we are asked to make heart blocks to be used when a member has lost a close family member, and we want to remind them that we're thinking of them. Anyway, the idea is to make up some to be kept on hand rather than when they're needed, so yesterday I decided to make a few after I finished putting the border on my quilt top, while I was thinking about it.


When you say "heart block" most people automatically think of a red heart on a white background, but actually the heart can be any color as long as the block measures 6-1/2".  In the top one at the left, I cut a heart from a piece of red scrap yardage I had on hand and appliqued it onto a white background.  In the second heart, I sewed together 3/4" black and white strips to make a mini 9-patch that I appliqued off-center onto a solid red fabric.  The b&w strips were cross cut at 1" to make the 9-patch. I did a little trimming to neaten it up :o)

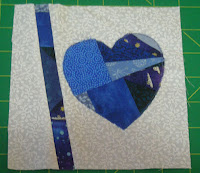
I decided to use blue scrap yardage to design the block below:


I cut a slash in the background fabric, added a 1" strip from scrap yardage for a little accent, then cut the 6-1/2" background to which I appliqued the blue heart.  Easy peasy! 

Well, today is the first day of summer - at last, the season has caught up with the heat!  Get out and enjoy it, but take a bottle of water with you.

Sew forth and sew on


Monday, August 8, 2011

My new series - Getterdone quilts

Get what??

Lately I've been going through my stash and trying to think of patterns that will help me use more of it, deliberately.  I want fast and easy patterns to make quilts that are also attractive!  These won't take the place of my regular stuff, it's just a way of getting quilts done fast - I'm calling them my "Getterdone!"  or "Get 'er Done!" quilts (what?  nobody ever watched the Blue Collar comedy tour?  good!).  And since I've just given them an official name, they deserve their own series, eh?  My GED series as it were.

I showed a fourpatch a couple days ago that did  use up  some... but it seems to me I created almost as many scraps as I used!  For this next one I thought I'd use "made" fabric (on the 15 minute blog Victoria has instructions on how she does this, and on Quiltville Bonnie shows how to make crumb blocks).

I started out with yardage from "made" fabric..
isn't that a large pile?  And that's not even all I had... and nope, I don't know how many actual yards there are because I didn't think to measure it before I cut into it!

I wanted my blocks to finish at 8-1/2" so I cut a 10-inch background square, made a diagonal slash through it and inserted a strip from the made fabric (from now on I'll refer to it as scrap yardage)...

I probably could have started with a smaller background square but I didn't want to fudge the cutting too much for the finished size; I have more fabric!

Then I slashed it, inserted a strip, slashed it, sewed in a third strip...

My goal was to have at least 2 inserted strips in each piece - some blocks have just two, some have three.  There was no rhyme or reason for how I cut the slashes, I just tried to make the blocks interesting!  Did I mind that the strips didn't match up when I rejoined?  Nope!

After slashing and inserting my scrap yardage strips, I trimmed down to 8-1/2"


Doesn't look like too much all alone, does it.  I even kept the cut off bits to use in more scrap yardage.  Recycle, repurpose, reuse...


Ta daa, my final blocks...

I made 42 of em!  I'm setting the blocks smack-on together, no sashing between.  I've sewn most of the top together already. 

You're probably thinking this will be too white and plain, but I don't think so - it'll look really great when I get the borders on.  I deliberately chose this light white-and-black background fabric because I wanted the strips to stand out.  A busier fabric would have competed too much with the strips - I want this to have impact!  Also, I had about 2-1/2 yards of this fabric and I used a lot of it.

You almost can't go wrong with this pattern, it goes together really really easy!  I made the scrap yardage here and there, when I didn't want to think about measuring or scant-quarter or reading instructions... but yet I wanted to get my hands into some fabric - some of you know what I mean.  You just grab some pieces and sew them onto other pieces until you get the size you need for your project.  Or until you get tired of sewing.  Just make lots and lots of yardage, you'll use it sooner or later!

The one thing to be aware of with scrap yardage is, you'll have lots of seams, there's no getting around it.  When you're sewing the bits together they get turned this way and that, it will not be all straight of grain... there's no way of getting around that either.  So... if you're willing to accept those limitations, you can have lots of fun making and using scrap yardage!

Sew forth and sew on til later